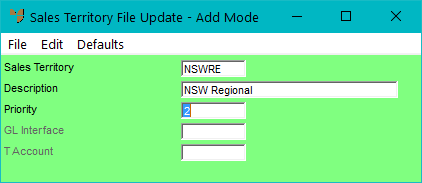
To add a sales territory to the Sales Territory master file:
Refer to "File - Sales Territory".
Micronet displays the Sales Territory File Update screen in Add Mode.
|
|
Field |
Value |
|---|---|---|
|
|
Sales Territory |
Enter an ID of up to five characters for the sales territory you are creating. |
|
|
Description |
Enter a description for the sales territory that will appear on inquiries and reports. |
|
|
Priority |
Every picking slip in the paperless queue is assigned a priority which determines the order in which the slips are downloaded to PDAs for picking. Those with a higher priority (lower number) appear higher up the list so they are picked first. That is, a slip with priority 1 will be picked before a slip with priority 10. Enter a number that represents the picking slip priority for this sales territory (it must be between 0 and 255). When determining slip priorities, Micronet checks:
For more information about slip priorities, see "Maintaining a Picking Slip (Priority, Picker, etc.) (v2.8)". |
|
|
GL Interface |
If you want to dissect sales/stock/debtors by a customer's sales territory, enter the name of the GL interface record for this sales territory. For more information on setting up GL interface records, refer to "Setting up Micronet Integration". |
|
|
T Account |
If you are using T accounting within MGL, assign the default T account for this sales territory. |
